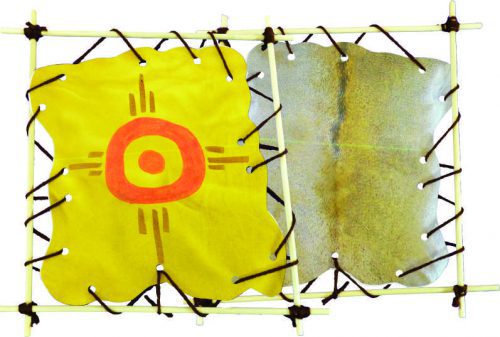
The ultimate fine motor skills craft, kids will cut, lace and tie to create this old-style hide rack!
Age: 6+
Duration: 15 minutes
Learning Outcomes: Learn about ancient techniques for drying and stretching animal hides and creating leather. Exercise fine motor skills as students cut, lace and tie this challenging craft.
You’ll Need:
- R15415 Indigenous Crafts Paper
- R5601 Plastic Lacing Needles
- 4 chopsticks, dowels, or sticks
- Yarn
- Washable Markers
- Scissors
- Tape
- Hole punch
- A ruler or tape measure

Start by choosing two sheets of craft paper. I chose to use the deer hide and the leather sheets, to show the two possible outcomes of drying animal hides. Use a small loop of tape in the center of the white sides of the sheets to hold them together. This way, both of your hides will be exactly the same shape when you cut them out.
Students can be as creative or literal as they want to when they cut the shape of their hides out. Remember that every animal is a slightly different size, so every hide is unique! I kept my shape vaguely rectangular, but you can choose a wild shape if you want to.
Once you have your hide shape cut out, use your hole punch to make regularly spaced holes. These will allow you to anchor your hide to the frame.
Now it’s time to create your frame. I used four 10″ (25.5 cm) long dowels from the craft store. You can use chopsticks if you want, or students can use small, straight twigs from the playground. Cut four 6″ (15 cm) pieces of yarn. Cross the ends of two of your dowels so that make a right angle. Use a piece of yarn to tie the two together. For a more secure tie, I wrapped my yarn twice in each diagonal, and twice above and below. Trim off any excess yarn.
Continue tying the ends of the dowels together until you have a square frame.
Once your frame is all put together, it’s time to hang your hide on it. Cut a piece of yarn approximately 30″ (76 cm) long, and thread one end through one of our plastic lacing needles. The flexible eye makes threading a breeze! Tie the other end of the yarn to the center of one of your four dowels. Loosely “sew” your hide to your frame. Remember that your hide is supposed to be suspended in the middle of the frame, so don’t pull your yarn too tight. When you come back to the place you started, tie the free end of the yarn to your frame. Trim off any excess yarn.
Now that your hide is stretched, it’s time to decorate! I used washable markers to create a design on the leather side of my hide, and left the deer hide half as it was. Students can use washable markers, crayons or colored pencils to decorate their hides.
This is a great take-home craft, but it also is a great addition to a report or presentation. A dynamic and tactile visual aid can help students absorb information and stay focused!
bundled price
to Cart

Like us on Facebook, Share this post with your friends, or Subscribe to this blog today to receive original craft project updates every week!

