Scents Sort Match-Up Kit

scents sorting sensory smell

Exercise your sense of smell with our Scents Sort Match-Up Kit! Help students learn everything they need to know about basic smells that we encounter in our daily experiences. 

The R62301 Scents Sort Match-Up Kit is great for encouraging children to explore their natural senses. The kit features 30 different liquid scents contained in small self-sealing capsules and 30 matching picture cards. Each of the capsules are numbered to correspond with the list of scent names featured in our guide here. The scents are also pleasing and familiar to students, including those of apple, grape, mint and so on.

Students can pop open the cap of each capsule and try to identify the scent they are smelling. Talk about the familiar scents and where students may have encountered them. When they have a clear idea of what kind of scent they are smelling, they can choose the correct picture card to match the capsule.

You can play one of six different educational games to enrich students’ exploration of their olfactory sense. These games attempt to provide students with cross curricular lessons such as brainstorming descriptive adjectives, or playing a number matching game. Find out more at this link!

Line-07

Like us on FacebookShare this post with your friends, or Subscribe to this blog today to receive original craft project updates every Monday, Wednesday and Thursday!

Spotlight on… Hidden Difference Puzzle Cards

2015-05-11-FeatureImage

Find all the differences between the colorful character cards in our Hidden Difference Puzzles! The puzzles are great for encouraging critical thinking through comparison and contrast.

The Hidden Difference Puzzle Cards each come in a set of 4, with 12 different character cards. Each of the cards features an image of a young person dressed in some kind of career uniform with an assortment of props related to that specific character. Each card in the set of 4 that is outlined in blue is your starting point. This is the card that you will use to compare to all the other cards! Take the blue card from any of the sets and discuss with your students what is featured in the picture. Observe the clothes that the young person is wearing. What kind of career is she or he representing? What are the elements in the picture that help support your students’ guesses?

new-6

Once you have an understanding of what each card represents, talk about what people in these professions do and how they are important to community building. You can even start to discuss with your students what kinds of interests they have that may be reflected in their career choices one day!

new-8

There are enough cards for pairs of students to work on finding all the differences together. The comparison cards are bordered in green for easy, yellow for intermediate and red for challenging, meaning that there are more differences in the cards as you progress through the more difficult cards.

Learning about comparisons is a great way to encourage critical thinking in students. If you’d like a more introductory approach to learning about different versus same, consider trying this activity! We used found things in a classroom and a salad tray to help students categorize the differences between items through tactile and visual sense. Once students are comfortable with identifying differences in objects, they can progress to using the Hidden Difference cards.

new-7

Get your students to mark down all the differences. They can use dry-erase markers directly on the cards to indicate where the differences are. The surface of the cards is easy to wipe with baby wipes or glass cleaner and paper towel. Once students are confident with their discoveries, they can check their work against all the answers printed at the back of the blue card.

This is a great activity to get students to work together while exercising their brains and having fun!

Line-21

Like us on FacebookShare this post with your friends, or Subscribe to this blog today to receive original craft project updates every Monday, Wednesday and Thursday!

Spotlight on… Dry Erase Blank Playing Cards

2015-04-27-FeatureImage

Play memory games, math games, traditional card games and more with our R49623 Dry Erase Blank Playing Cards

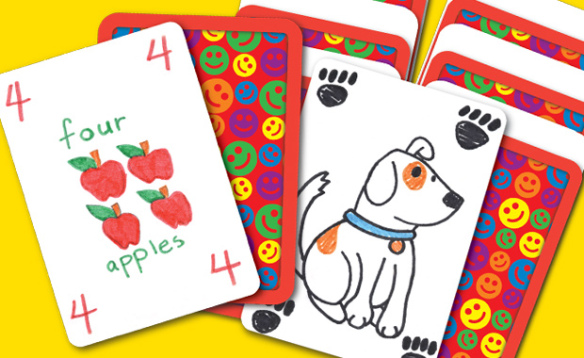
The cards are specially designed to be reusable because of the dry erase surface. Use dry erase markers to write numbers and letters or to draw illustrations. The writings and drawings will easily wipe off with a bit of paper towel or glass cleaner to restart the activity!

There are 60 cards in each pack, giving you enough value and quantity for group gameplay and re-use.

We will list two suggested activities for each type of playing card game based on 2 different subjects: math and literacy. These activities are based on card games that can be played from kindergarten to grade 2. We’ve added alternative suggestions to help challenge older students as well.

MATH

Explore numbers through quantity games and memory matching!

Pre-K to Kindergarten: Get a set of 10 playing cards. On one set of 5 cards, write each number between 1-5 on separate playing cards. On the second set of 5 cards, repeat the same process. You may draw little shapes or illustrations (such as squares or apples) to correspond with the number written on each card. Take the finished cards and shuffle them together, then place them face-down on a flat surface. Ask a student to pick the first card from the top of the deck, flip it over and say the number on the card out loud. Students can use the visual cues on each card to indicate the quantity. Instruct students to take each card they draw and place them face up onto a flat surface. If the next card they draw is different from the first, they must figure out if the card should be placed before or after the previous card. This will help students understand the placement of numbers along the number line. If they draw a card that’s the same as another card they’ve drawn, they must place the cards on top of the previous card to indicate that the numbers match. The game is over when all the cards have been flipped over and placed in their appropriate areas.

Grades 1-2: This game is for 2 players, but can be adapted for one. Create 3 sets of 10 playing cards with the numbers 1-10 written on each separate card. Shuffle the cards together and place face down in a deck. Take three more cards and write the addition (+), subtraction (-) and equal sign (=). Choose either addition or subtraction to be the main operation and place it face up in front of the students. Place the card with the equal sign to the right of the operation card. Ask each student to draw 4 cards from the deck. Whoever goes first must draw a ‘wild card’ from the deck and place it to the right of the equal sign. This number is the result that each player must try to match with an appropriate pair of cards from their hand. They can only choose two cards that must either add together or subtract from one another to match the wild card result. If the player cannot match any of the cards in their hand together, they must draw another card from the deck. The player to put down the first correct combination of numbers to match the result gets a point. Place used cards in a discard pile. Once all the cards have been drawn, or if a player has discarded all cards from his or her hand, the game is over. The player with the most amount of points wins!

LITERACY

Students can exercise their knowledge of letters and word combinations using the playing cards!

Pre-K to Kindergarten: Students in this grade level are just starting to learn about the letters of the alphabet. Write all the uppercase letters of the alphabet on separate playing cards. Write all the lowercase letters of the alphabet on a separate set of playing cards. Combine the set together and separately lay all the cards face down on a flat surface. The objective of the game is to find two matching pairs, the uppercase and lowercase letters. As the students flip over each of the cards, they must call out the name of the letter on the card. This will help students with letter retention. Once they have matched all the upper and lowercase letters together, the game is over!

Grades 1-2: Students in this grade level are able to put together short words to make simple sentences. To expand on this, write single words onto each of the cards. Use familiar words that your students have learned or are in the process of learning about. Include a variety of words such as nouns, verbs, adjectives, pronouns and articles. Mix up the cards and place them all face up on a flat table. Ask students to pick out a word and form their own sentence around it. Challenge older students to form a complete sentence using only the words on the playing cards! What kinds of cool sentences can you come up with?

You can form your own playing cards that are useful for playing games such as Go Fish, Concentration or Memory… and you never have to worry about how to work your lessons around a specific type of resource.

Line-09

Like us on FacebookShare this post with your friends, or Subscribe to this blog today to receive original craft project updates every Monday, Wednesday and Thursday!

Light Cube: Shell X-Rays

2015-04-30-FeatureImage

Observe transparencies of x-rays to see cool images! Our R5913 Shell X-Rays & Picture Cards work great with the Educational Light Cube. 

IMG_9609

The Shell X-Rays and Picture Cards give you two cards per shell. One is an x-ray to see the inner details of each shell while the other is a picture card to show the shell in reality. This kit presents great value as it does not solely have to be used with a light table… although it works well with our Light Cube!

IMG_9612

John placed the cards onto the table to see how the insides of the shells look like.

IMG_9613

It was a nice exercise to compare and contrast the picture cards with their matching x-rays. We asked John to find the matching pairs, which was a good exercise in making connections with visual cues.

IMG_9614

Does that one fit? John used the guide provided with the picture cards to learn more about the type of shell in each card.

IMG_9622

There are 36 cards and x-rays in total and a detailed guide with information about each of the shells. It’s a great resource for enriching your science lessons!

Line-02

Like us on FacebookShare this post with your friends, or Subscribe to this blog today to receive original craft project updates every Monday, Wednesday and Thursday!

Light Cube: Light and Bubbles

bubbles light cube

To make your messier projects easy to contain on the R59601 Educational Light Cube, we’ve developed a tray that fits perfectly on top of the Light Cube. The tray is available in our R59602 Educational Light Cube Accessory Pack.

bubbles light cube

First, place the tray directly onto the top of the Light Cube. The clear plastic design will allow the light to show through clearly, while making it easy to keep the cube clean! We mixed up a simple bubble solution with 2 parts water to 1 part dish soap. We poured the resulting mixture into a shallow bowl. You can use something similar to the lid of a jar for the shallow bowl. Pick a cool bubble wand that you’d like to use to form your bubbles and dip it evenly into the shallow bowl.

bubbles light cube

Ciara gently blew through the wand to create a mini bubble on the tray. You can compound various bubbles onto the tray and build a mini bubble tower!

bubbles light cube

Ciara continued to build on the tray with little bubble ‘blocks’! This is a great exercise in focused preschool play, as children challenge themselves to blow bigger bubbles or to fill the tray with bubbles.

bubbles light cube

How big can you make the bubbles? As big as you want!

Line-14

Like us on FacebookShare this post with your friends, or Subscribe to this blog today to receive original craft project updates every Monday, Wednesday and Thursday!

Light Cube: Floating Density Experiment

light cube floating objects

Explore the densities of various objects using bubbly soda water and a few clear glasses on the Light Cube!

light cube floating objects

Pour a bit of club soda into a clear glass. In the second glass, pour some water. The carbonated fizz or bubbles in the soda will start to lift and dance around inside of the glass. Ask students to consider why the carbon rises up and out of the glass.

light cube floating objects

We asked our friend Malak to observe the bubbly fizz and the glass of water and try and guess what will happen if she dropped a toothpick into each glass. She guessed that the toothpick would sink in the glass with water, and rise in the glass with soda.

light cube floating objects

As you can see, the toothpick floats midway up the glass of water. Interesting! Why is this so? Malak asked if this had something to do with the wood of the toothpick… perhaps it floats like a log in water? We moved on to test her hypothesis of whether or not the toothpick would float in the glass with soda.

light cube floating objects

This time we dropped the toothpick into the glass of soda and observed that it proceeded to float just like the toothpick in water.

light cube floating objects

We tried the hypothesizing and experimenting again with other found items such as buttons, beads and erasers.

light cube floating objects

Ooh! Now we have a surprise. We guessed that the Fancy Stringing Ring we dropped into the glass with water would float. It floated when we dropped it into the glass with soda. But why did it sink to the bottom? These are great questions to be asking your students as you develop new theories on why some items float why others do not.

Line-20

Like us on FacebookShare this post with your friends, or Subscribe to this blog today to receive original craft project updates every Monday, Wednesday and Thursday!

Light Cube: Colorful Block Combinations

light cube blocks

We’ve established many times that working with blocks on the Light Cube is a great way to engage students who love to build–it helps to focus their attention with beautiful light and color combinations! 

light cube blocks

These blocks were found at our local toy store but we found them to work amazingly well with the Light Cube. We set the glow to a soft white and placed the blocks on top.

light cube blocks

We asked our friend Stephano to arrange the blocks into the tallest tower he could manage to make on top of the Light Cube.

light cube blocks

Since the blocks are rectangular, they can only be stacked together in an intertwined pattern like Jenga blocks!

light cube blocks

We showed Stephano how to interlock the pieces together. As he gradually stacked upwards, he started to turn the blocks in different angles, which produced a slightly different tower than the one we envisioned.

light cube blocks

Here is the tower all finished! Look at that amazing lean… what will happen when Stephano plays a round of Jenga?

light cube blocks

He decided not to ruin his tower, as it was accomplished with a neat new building pattern! When have you seen a Jenga tower look so sculptural?

light cube blocks

…But we dared Stephano to try removing one block anyway and he settled for selecting one from the top. The whole top half went crashing down! “That’s okay,” Stephano told us, “I’ll build it up again!”

Line-04

Like us on FacebookShare this post with your friends, or Subscribe to this blog today to receive original craft project updates every Monday, Wednesday and Thursday!

Light Cube: How to make a light show with clear colorful cups!

stacking color cups light cube

We’ve done a post on stacking colorful cups on top of the Light Cube. But what if you combined a variety of different colorful cups together in all shapes and sizes to create a beautiful sculpture… AND a light show?

stacking color cups light cube

Stacking multiple cups together will intensify their colors on the Light Cube. You can find these cups at your local dollar or department store. Look for discount camping or patio sets for the clear plastic kinds. The colors of the clear cups will show up more clearly on the Light Cube.

stacking color cups light cube

We asked our friend Sierra to take the cup piles apart and stack them to make a tall building.

stacking color cups light cube

She found that by inverting the direction of the cups, she was able to build one on top of the other securely without it falling apart.

stacking color cups light cube

Look at how tall Sierra built the cups!

stacking color cups light cube

The next challenge was to take another set of cups and figure out a way to stack them upwards. The way we have these martini glasses stacked up–without the bases–make it impossible to build them into a tall tower.

stacking color cups light cube

Once we added the bases to the cups, Sierra was able to build them up without a problem.

stacking color cups light cube

There’s more than enough space on the Light Cube to combine multiple cups together. Sierra got the idea to use the margarita glasses as the bases for her structure.

stacking color cups light cube

She used the regular cups and stacked them, inverted, onto the margarita glasses.

stacking color cups light cube

Look at that concentration! Sierra was so careful not to let anything lean or fall over.

stacking color cups light cube

Sierra was amazed with the light effects. Look at how the blue stem of the margarita glass combines with the pinky red of the margarita glass behind it to make a purplish hue. This is just one example of how the Light Cube enhances the combinations of different materials, such as these cups!

stacking color cups light cube

This is the final structure that Sierra built! Isn’t it beautiful?

What kinds of structures can your students build on their light tables? 

Line-18

Like us on FacebookShare this post with your friends, or Subscribe to this blog today to receive original craft project updates every Monday, Wednesday and Thursday!

Light Cube: There’s a man on the moon… sand!

light cube sand

Moon sand is a great tool for playing with on the Light Cube. Place it inside a snugly fitting Light Cube tray to keep it from spilling over the sides.

light cube sand

Moon sand can be made at home with a few simple ingredients such as cornstarch, sand and water. To learn more about how to make your own moon sand, visit the link here!

light cube sand

Using our little vials, we asked our friend Ciara to pack the sand into little columns. How long could she get the columns to stand before they slide apart?

light cube sand

Ciara decided to mold a little snowman out of the moon sand. It actually held really well together, so she added some straws to form the snowman’s arms.

light cube sand

All done and still standing! The rest of the moon sand looked a lot like snow on the ground being illuminated by the Light Cube underneath.

Line-03

Like us on FacebookShare this post with your friends, or Subscribe to this blog today to receive original craft project updates every Monday, Wednesday and Thursday!