This simple craft base is perfect for all kinds of classroom projects!
Are students getting bored with writing? Has math lost it’s luster? Everything is more special when it is published! Reinvigorate students by teaching them how to create this little booklet and writing their own stories, favorite math facts, “All About Me” arts and more!
Age: 5+
Duration: 5 minutes
Learning Outcomes: Practice making neat, precise folds. Add pizzazz to language and math activities. Encourage young writers to “self publish.” Exercise fine motor skills.
This craft perfectly combines early geometry with Thanksgiving cheer!
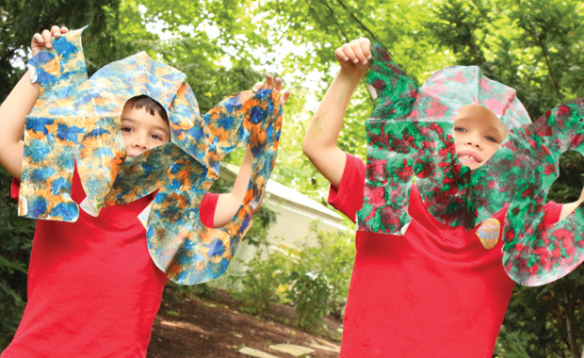
In order for creativity to flourish, students need a solid understanding of the fundamentals. What underpins the fundamentals is vocabulary. A student has to be able to describe their world and what they see before they can change it and create new things. This activity is a great way to connect the visual aspect of shapes to the vocabulary that students will use for their entire academic careers. Fold a single circle first into 2D then 3D shapes, while getting as detailed as your students are ready for. In the classroom, it might be useful to copy the circle onto an overhead transparency or a sheet of clear Mylar so you can demonstrate for the whole class as you take them through this lesson.
What’s great about this activity is that is can be used for a wide range of ages and developmental levels. Very young students practice their fine motor skills while they fold, and build their vocabularies by identifying the basic shapes they are making. For older and more experienced students, this activity is a great way to practice geometric vocabulary while learning technical aspects of shapes like faces, vertices and angles. Even better, at every level this is a no-fail activity, so while students are practicing vocabulary, they are succeeding at the basic folds. The small success bolsters confidence, and motivates students to take risks.
Age: 4+
Duration: 15 minutes
Learning Outcomes: Practice and reinforce geometry and vocabulary. Create a cute Thanksgiving craft. Exercise folding skills and following directions.
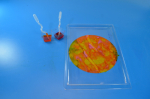
The first step for this adorable holiday craft is to decorate your base. Place a color diffusing circle on an art tray or cookie sheet for each student, and have the pipette liquid watercolors onto the circle. Be sure to cover the entire surface! Students can use a pre-mixed orange, or they can experiment with pipetting yellow and red separately. Leave the circles to dry.
Once the circles are dry, it’s time to fold them up! We have created a special video to demonstrate the process:
Use this opportunity to talk to your students about circles. Circles are a regular shape, with a single face. Challenge students to think of where circles are in the world. They might suggest bicycle or car tires, pizzas or the moon and sun. Older students can talk about the mathematical properties of the circle, like the diameter (the distance between two opposite points), radius (the distance from the center to any single point on the curve) and the circumference (the distance around the outside of the circle). Challenge your students to find the area of their circle, using the formula A = r2. A stands for area. Area is the amount of flat space a shape takes up.
This activity is great for a few different reasons. First, it’s easy to do; as a no-fail activity it’s entertaining to students of all ages and it boosts confidence. Second, it’s an easy-to-scale activity. You can fold a circle with four year olds or fourteen year olds, and the conversations can reinforce basic shape names or basic geometry. Some of the shapes we fold are uncommon, so reinforcing them in this activity is important.
Once students have achieved their 3D Icosahedron, tape the bottom so the shape holds. Now you have the base shape for your slice of pumpkin pie!
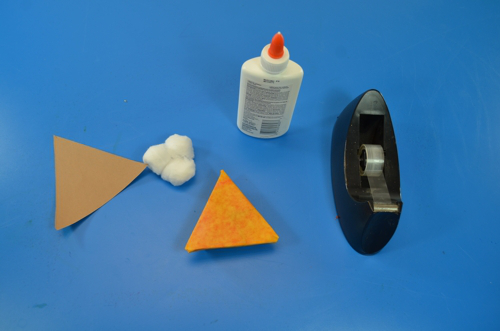
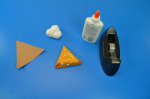
To decorate your slice of pie, start by adding a crust! Cut out a triangle of brown construction paper that is approximately 4 1/2″ high (from center base to point) and 5″ wide at the base. Glue the triangle to the base and one edge of your color diffusing icosahedron. Use scissors with wavy blades to trim the base of the triangle so it looks like the crimped edge of a pie crust!
To top off your slice of pie, fluff up a cotton ball and glue it to the top. No pumpkin pie is complete without the whipped cream!
Like us on Facebook, Share this post with your friends, or Subscribe to this blog today to receive original craft project updates every week!
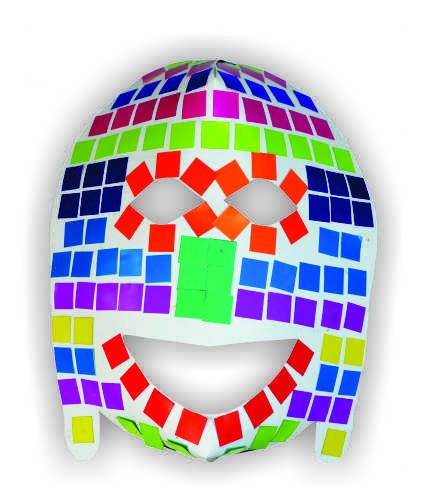
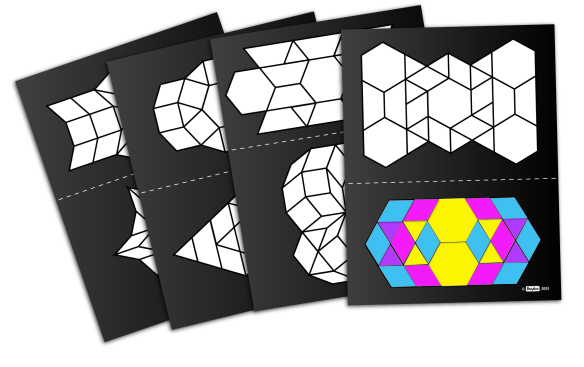
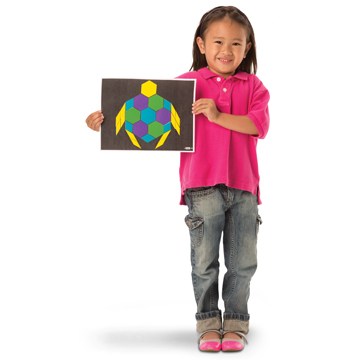
Inspired by Pattern Blocks, we’ve created 6 shapes that can be used to make wonderful tessellation patterns. Shapes are: equilateral triangle, rhombus, trapezoid, hexagon, square and small rhombus. Each shape is carefully crafted to match the sides and angles of the other shapes allowing your students to use the shapes to create seamless tessellations or to design animals, people, vehicles, structures and patterns!
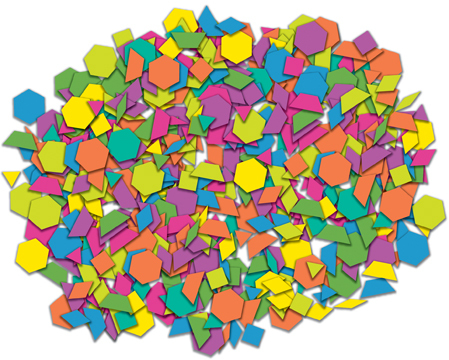
Unlike Pattern Blocks, which have specific colors for specific shapes, our tessellations mosaics come in a range of 12 bright, glossy, double-sided colors. Your students can make patterns with similar colors or challenge themselves by creating patterns in different colors. Get students acquainted with the different shapes and talk about their characteristics by giving each group a bowlful of the Tessellations Mosaics. Ask students to sort the mosaics only according to color. They must choose one color and find all the shapes in that color. Note: Make sure to point out that the mosaics are double-sided!
Once all the shapes are found, ask students to describe each shape to you.
What do the shapes look like? For instance, some children may say the trapezoid reminds them of a roof. Once your students get a chance to share their opinions on the shapes, discuss the characteristics of the shapes. We’ve included a short description of each of
the shapes later on in this guide. Now comes the fun part—putting the Tessellations Mosaics together! Pull out the provided pattern sheets and photocopy each set. Keep the
original sheets safe for future use. There are 2 patterns on each sheet. Print as many sheets as required for your class. You can provide the entire sheet with both patterns to students or cut the sheets and hand out one pattern each.
Fill in the puzzles with the shapes shown in the outlines. Before students fill in their patterns with the mosaics, encourage them to experiment with colors. For their first pattern, students can make the shapes match all in one color. Once they get comfortable with arranging the Tessellations Mosaics onto the pattern sheet, they
can switch out different colors for the same shapes. For instance, instead of filling a pattern sheet with Tessellations Mosaics all in red, students can switch out some of the red shapes for the same shapes in blue.
Make new patterns with these color arrangements! After all the students have arranged and glued down their mosaics, compare the patterns to see how different color combinations change how the patterns look. These patterns are intended to teach students how to put the mosaics together. They are meant as a guide to understand how the edges and angles of the shapes can be matched. Some of the patterns can be replicated to make regular tessellations. These patterns can be tiled together to make even larger and more impressive patterns. Ask children to cut their patterns and arrange one big tessellation on a bulletin board.
To add more value to your Tessellations Mosaics pack, go online to download our amazing patterns featuring kaleidoscope-like designs and fun animals! Click on the ‘Artwork’ link to access the resources in printable PDFs. You can access the artwork directly here. Fill in the designs with the Tessellations Mosaics! Draw thematic backgrounds, such as an ocean, the plains or a jungle onto the animal puzzle cards!
Like us on Facebook, Share this post with your friends, or Subscribe to this blog today to receive original craft project updates every week!
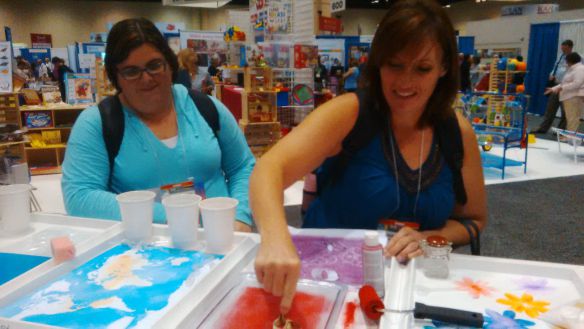
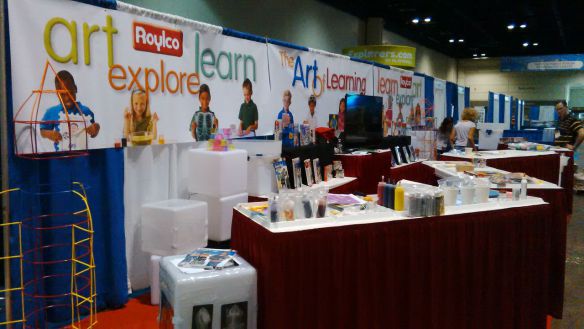
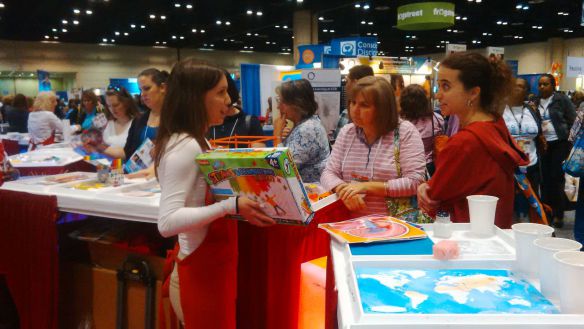
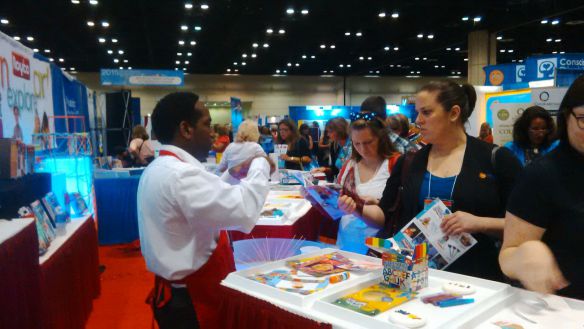
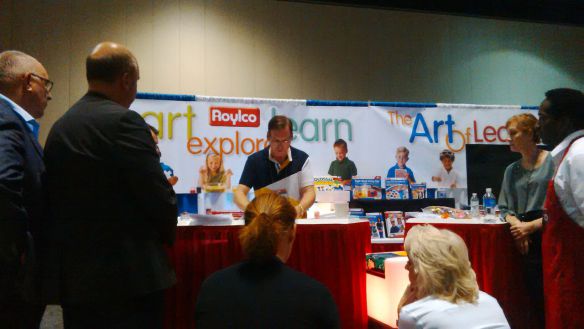
This year, the creative folks at Roylco returned to the Annual NAEYC Conference, which was being held in sunny Orlando, Florida! Check out some of our favorite moments captured on our cameras!
Every year, the National Association for the Education of Young Children hosts a large space for companies who specialize in art education (like us!) to showcase their materials and talk one-on-one with the teachers. We had a prime location nearby the entrance to the hall, and welcomed hundreds of visitors!
Our booth featured a fantastic array of our products, with 4 tables zig-zagging across the front. This allowed us to demo some of the products to our teacher friends while encouraging a flow of traffic through our booth.
We showed off some of our new products too! Look out for some of the following great products coming out next year at your local educational retailers:
R60705 Neon Straws and Connectors
R54490 Chromatography Kit
R48236 Junior Fun Faces Mix and Match Rubbing Plates
R59270 My Body in Action Cards
R49143 All About Me Book
We had great fun talking about our published ebooks as well (soon to be available on our website!), including The Art of Learning, The Art of Engineering, The Human Body: Inside & Out, Light Table Magic and Learn Math… Without Knowing It! Each e-book is a gigantic resource for teachers, featuring over 50 ideas for implementing art-based learning through various subjects. The focus is on FUN learning, meaning that we don’t provide any worksheets or practice lessons that students need to learn. Instead, we focus on building quality experiences within the classroom, using those experiences as a strong foundation, and strengthening those experiences with further tie-ins.
We love our teachers and strive to make the difference with all our products! Email us at info [at] roylco [dot] com for more information about our 2016 products and e-books!
Like us on Facebook, Share this post with your friends, or Subscribe to this blog today to receive original craft project updates every week!
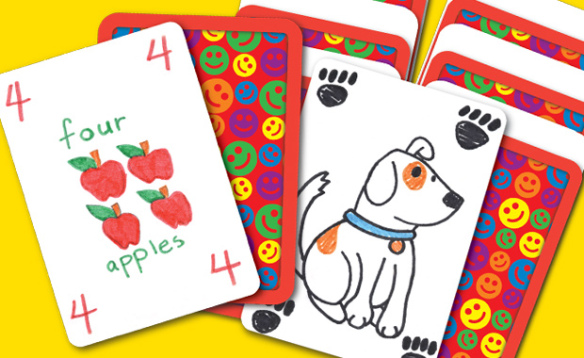
The cards are specially designed to be reusable because of the dry erase surface. Use dry erase markers to write numbers and letters or to draw illustrations. The writings and drawings will easily wipe off with a bit of paper towel or glass cleaner to restart the activity!
There are 60 cards in each pack, giving you enough value and quantity for group gameplay and re-use.
We will list two suggested activities for each type of playing card game based on 2 different subjects: math and literacy. These activities are based on card games that can be played from kindergarten to grade 2. We’ve added alternative suggestions to help challenge older students as well.
MATH
Explore numbers through quantity games and memory matching!
• Pre-K to Kindergarten: Get a set of 10 playing cards. On one set of 5 cards, write each number between 1-5 on separate playing cards. On the second set of 5 cards, repeat the same process. You may draw little shapes or illustrations (such as squares or apples) to correspond with the number written on each card. Take the finished cards and shuffle them together, then place them face-down on a flat surface. Ask a student to pick the first card from the top of the deck, flip it over and say the number on the card out loud. Students can use the visual cues on each card to indicate the quantity. Instruct students to take each card they draw and place them face up onto a flat surface. If the next card they draw is different from the first, they must figure out if the card should be placed before or after the previous card. This will help students understand the placement of numbers along the number line. If they draw a card that’s the same as another card they’ve drawn, they must place the cards on top of the previous card to indicate that the numbers match. The game is over when all the cards have been flipped over and placed in their appropriate areas.
• Grades 1-2: This game is for 2 players, but can be adapted for one. Create 3 sets of 10 playing cards with the numbers 1-10 written on each separate card. Shuffle the cards together and place face down in a deck. Take three more cards and write the addition (+), subtraction (-) and equal sign (=). Choose either addition or subtraction to be the main operation and place it face up in front of the students. Place the card with the equal sign to the right of the operation card. Ask each student to draw 4 cards from the deck. Whoever goes first must draw a ‘wild card’ from the deck and place it to the right of the equal sign. This number is the result that each player must try to match with an appropriate pair of cards from their hand. They can only choose two cards that must either add together or subtract from one another to match the wild card result. If the player cannot match any of the cards in their hand together, they must draw another card from the deck. The player to put down the first correct combination of numbers to match the result gets a point. Place used cards in a discard pile. Once all the cards have been drawn, or if a player has discarded all cards from his or her hand, the game is over. The player with the most amount of points wins!
LITERACY
Students can exercise their knowledge of letters and word combinations using the playing cards!
• Pre-K to Kindergarten: Students in this grade level are just starting to learn about the letters of the alphabet. Write all the uppercase letters of the alphabet on separate playing cards. Write all the lowercase letters of the alphabet on a separate set of playing cards. Combine the set together and separately lay all the cards face down on a flat surface. The objective of the game is to find two matching pairs, the uppercase and lowercase letters. As the students flip over each of the cards, they must call out the name of the letter on the card. This will help students with letter retention. Once they have matched all the upper and lowercase letters together, the game is over!
• Grades 1-2: Students in this grade level are able to put together short words to make simple sentences. To expand on this, write single words onto each of the cards. Use familiar words that your students have learned or are in the process of learning about. Include a variety of words such as nouns, verbs, adjectives, pronouns and articles. Mix up the cards and place them all face up on a flat table. Ask students to pick out a word and form their own sentence around it. Challenge older students to form a complete sentence using only the words on the playing cards! What kinds of cool sentences can you come up with?
You can form your own playing cards that are useful for playing games such as Go Fish, Concentration or Memory… and you never have to worry about how to work your lessons around a specific type of resource.
Like us on Facebook, Share this post with your friends, or Subscribe to this blog today to receive original craft project updates every Monday, Wednesday and Thursday!
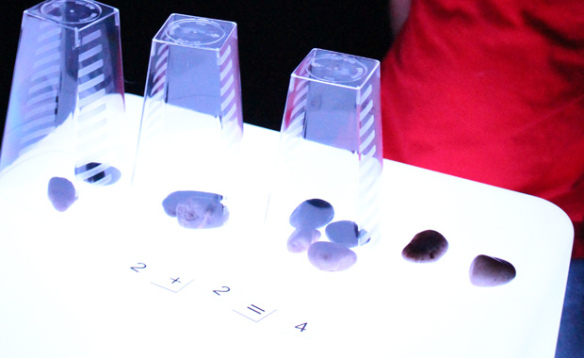
The Light Cube is a great medium for learning math lessons! Instead of the same old boring tabletop math activity, take it one step further with light-enhanced materials.
Everything looks better with light, that’s why we’ve made our math lessons extra-special on the Light Cube!
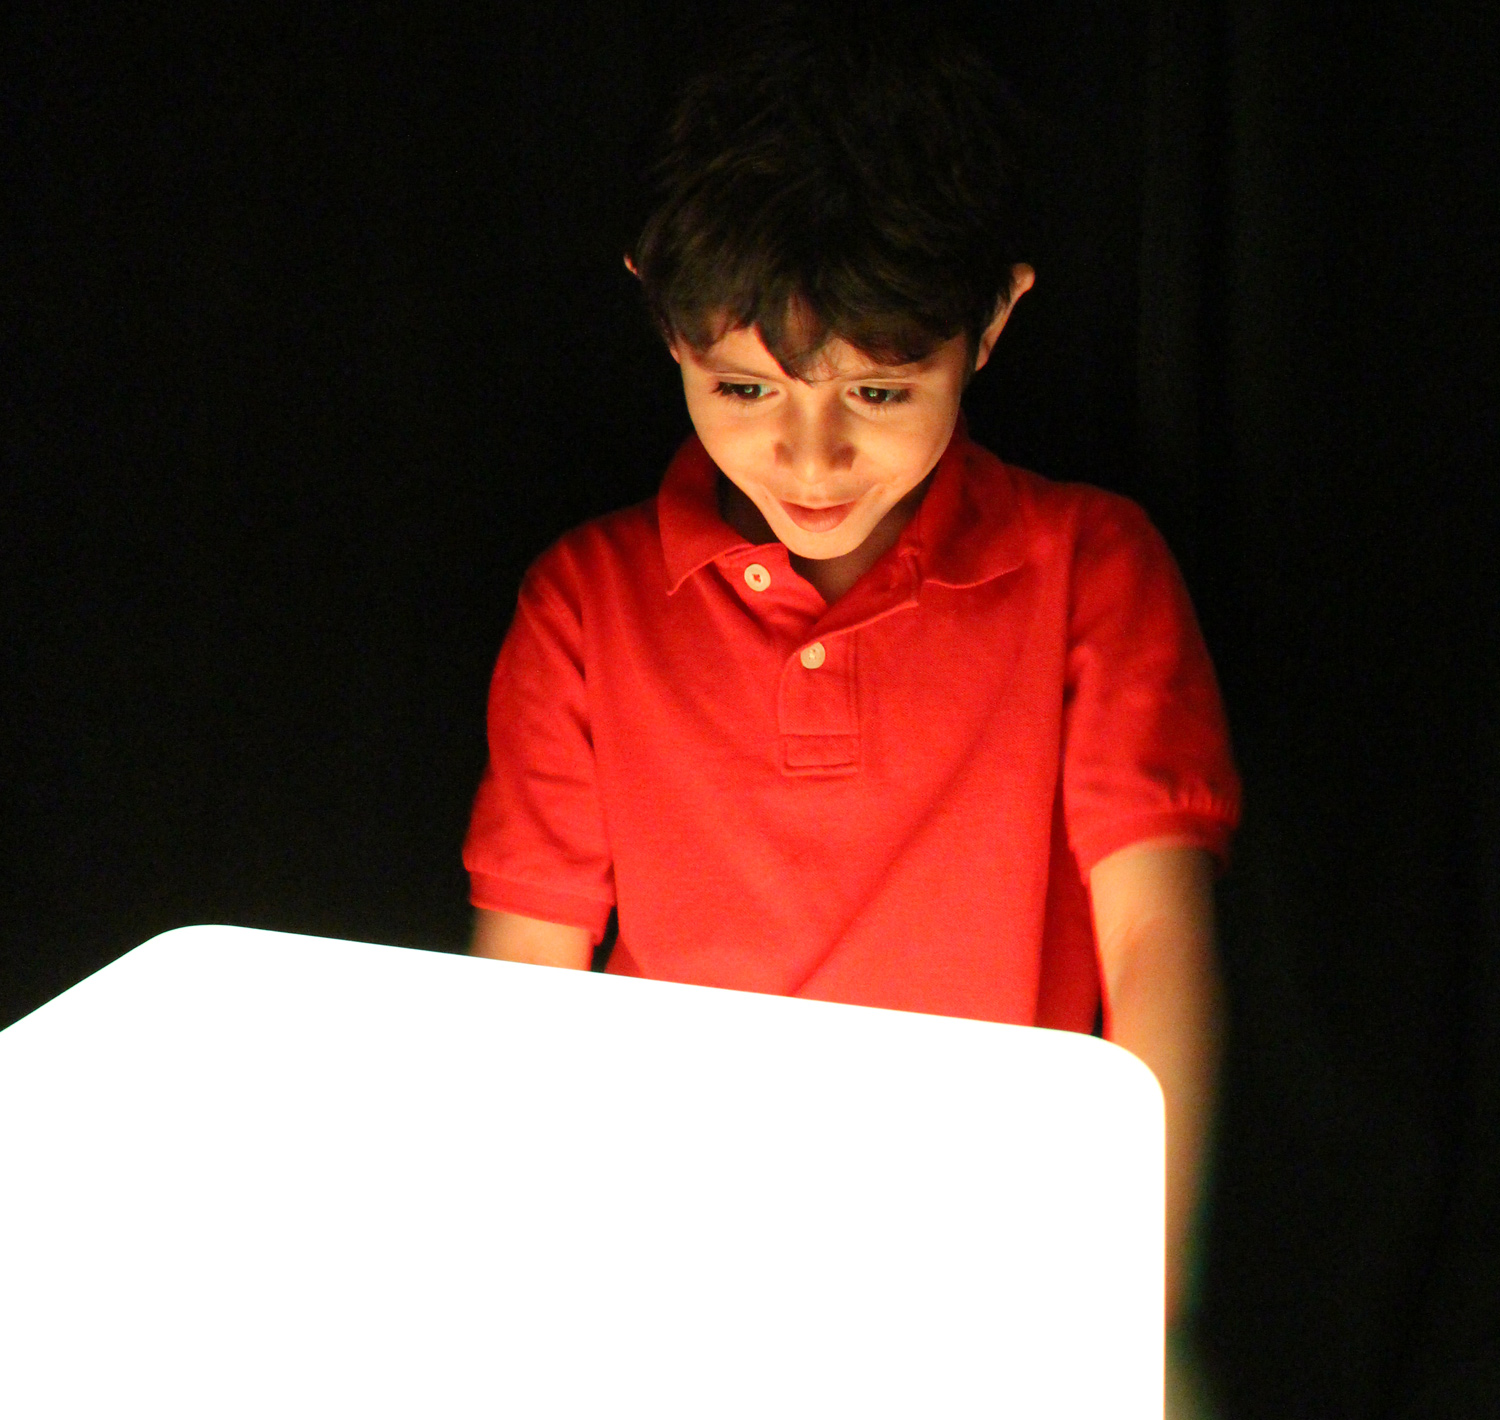
We brought an older student, John, in to see the Light Cube for the first time. Before turning it on, however, we told him that he would be going through some math exercises. John immediately looked at us like he didn’t want to have anything to do with math! But as soon as we turned the Light Cube on, his expression completely changed, and we grabbed a great photo of his reaction!
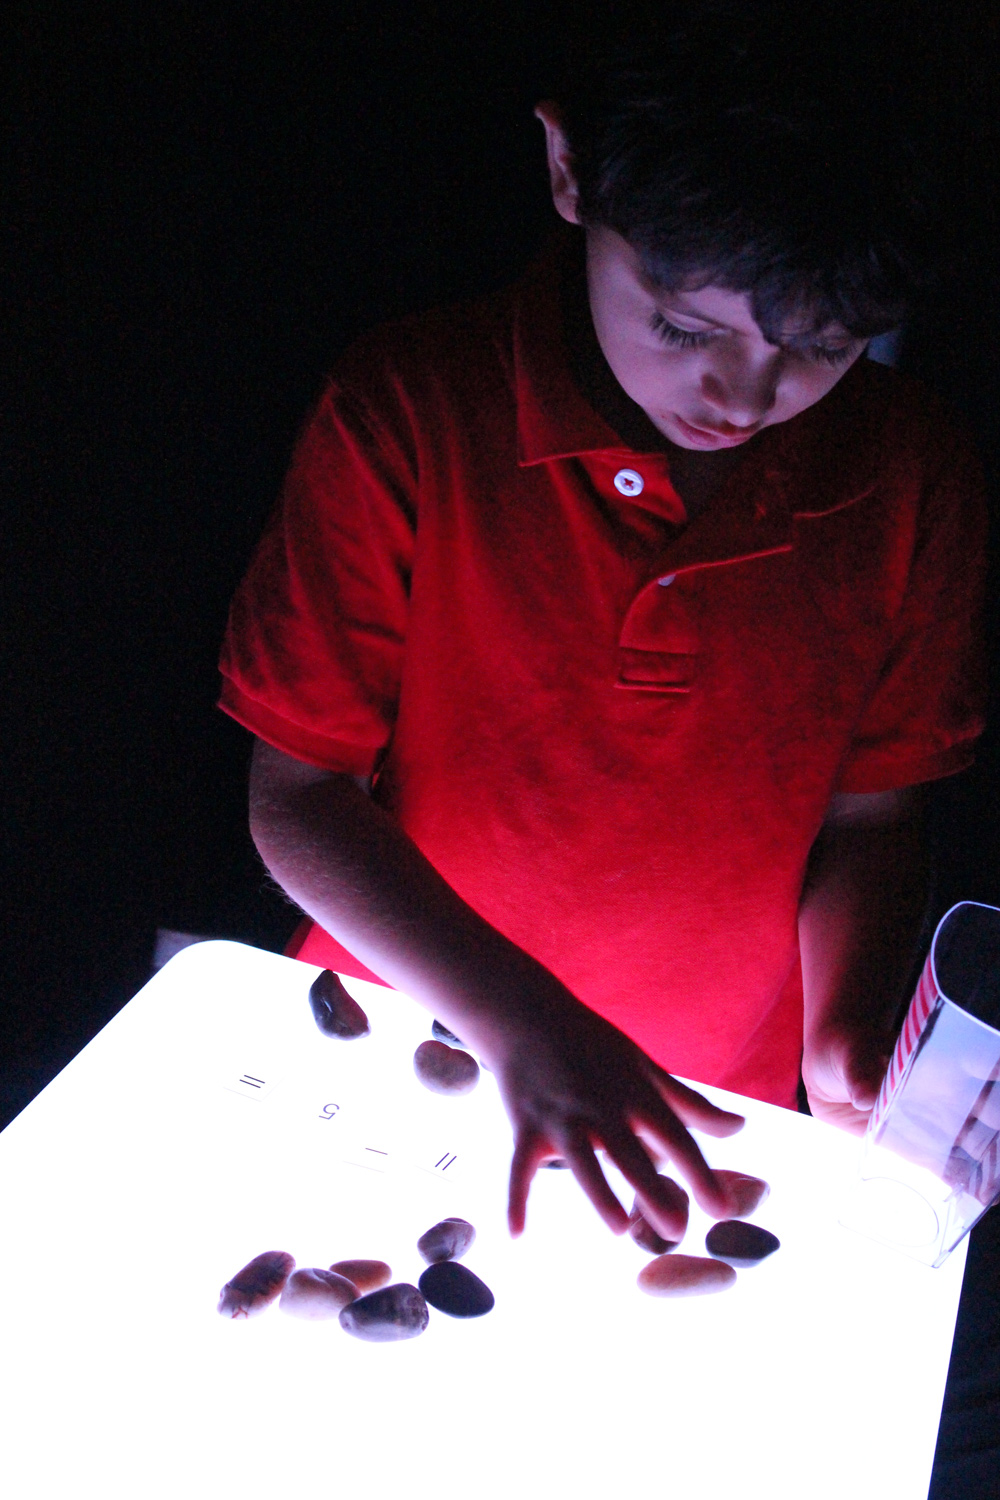
So, we got started! We placed a few clear color cups and garden rocks we picked up at the Dollar Store onto the Light Cube. John was entranced by the way the light shone through the clear cups, but the rocks completely blocked out the light, meaning that they are opaque. It was great to talk about the differences between items, to learn about transparent or semi-transparent versus opaque objects… and a great boost to children’s vocabulary!
We placed clear numbers and operations onto the table. Above, we organized the number sentence to say 11 – 5 = ? We asked John to take 11 garden stones, then remove 5 from the main pile to a separate pile and count the remainder.
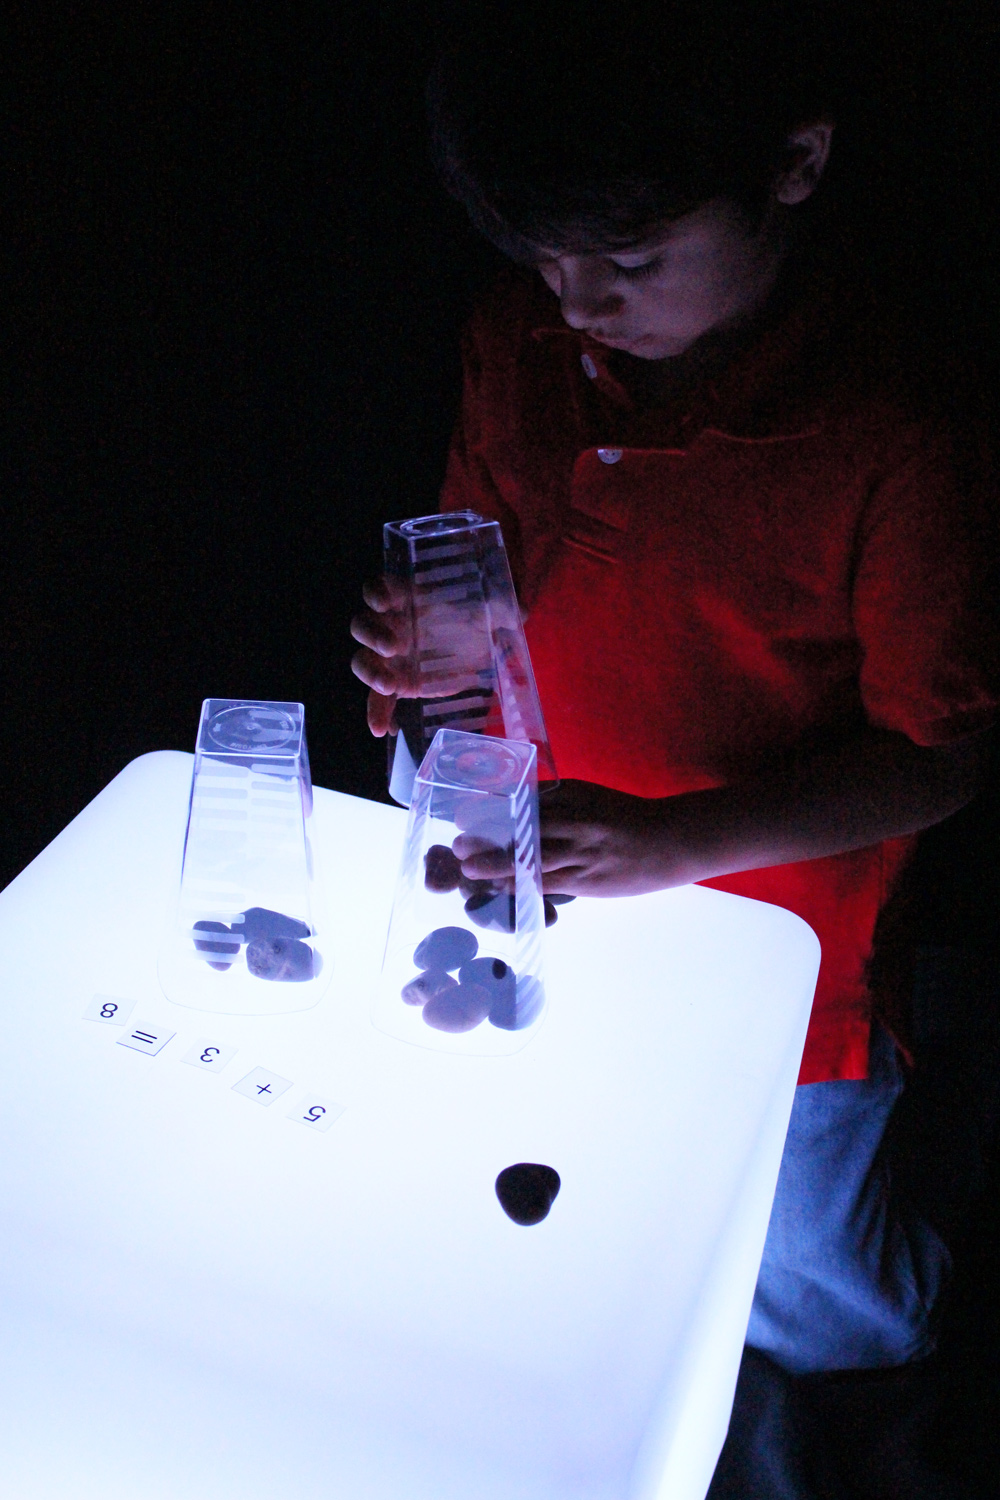
To complicate the activity a little bit, we decided to incorporate the clear color cups. We separated the stones into 4 piles, starting with 1 stone in the first pile, 2 stones in the second pile and so on. John secured each of the piles separately by placing the clear color cups on top.
Once we posed a number sentence to John, he immediately redistributed the stones inside each cup to match the given numbers. He compiled the final amount of stones into a single cup. We counted and found his answer to be correct: the number 8!
What’s the answer to this one? By this point, it was pretty easy for John to figure out. We had a lot more fun than we’d thought learning math on the Light Cube… because it puts things in a whole new light!
Like us on Facebook, Share this post with your friends, or Subscribe to this blog today to receive original craft project updates every Monday, Wednesday and Thursday!
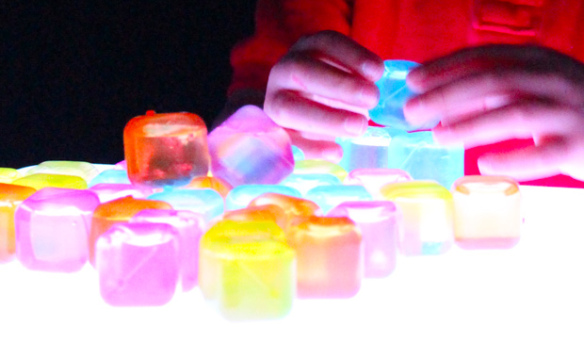
Play with color and light while building on the Light Cube! These little blocks were used to explore concepts in math as well.
Here, we laid out the colorful blocks and asked the student to build a tower as tall as he could make it.
Here, Roberto noticed the saturated blue of the block he was holding and found it amazing how it seemed to change color as he lifted it off and away from the glow of the Light Cube.
Now how do the colors look like all bunched together?
With the amount of clear color blocks we had, we decided to use them for counting! We laid down a number and asked Roberto to line up as many blocks beside it as required to match the number. The gel numbers were found at our local dollar store as window clings!
Here we are matching up to the number six! Keep cycling through different numbers to build number value recognition.
Like us on Facebook, Share this post with your friends, or Subscribe to this blog today to receive original craft project updates every Monday, Wednesday and Thursday!
It’s almost time to celebrate the 100 days of School! What types of festivities are you planning for this special event? We suggest using our R75423 100 Days of School Finger Paint Paper to do a painting activity!
Age: 5+
Duration: 5-10 minutes
Learning Objectives: Learn about the number 100! Explore the number’s shape. Keep track of the number of paint blots to cover the full surface. Integrate activity into study of numbers up to 100. Use fine motor skills to carefully grasp balloon while painting.
Cover your workstation with newspapers to prevent paint from making a mess. It’s a good idea to contain all paint in separate paint bowls. That way, there will be less spills to deal with!
First, pick two colors of paint you will want to work with. They can be complementary colors, or whatever combination you wish! Squeeze one color into the center of the bowl so it fills the bottom. Now squeeze the second color in the center of the first color, but do not over-pour. You want to create a starburst effect from the two colors.
Blow up your balloon with just a small amount of air. Our friends found out that blowing up the balloon all the way made it harder to use. You want just enough air to make it squishy enough for the kids to hold.
Once you have a good size that can fit into the bowl, dip into the paint and press onto the paper. This will create a really cool paint blot effect!
Guide students to keep their blots deliberate and directed straight onto the paper. They can keep paint blotting the image until the entire sheet is covered.
Fingerpaint dries fairly quickly if left out in the sun for a few minutes!
What a beautiful effect! You can challenge your students to count to from 1-100 and see how many blots it takes to fill the entire paper.
Like us on Facebook, Share this post with your friends, or Subscribe to this blog today to receive original craft project updates every Monday, Wednesday and Thursday!
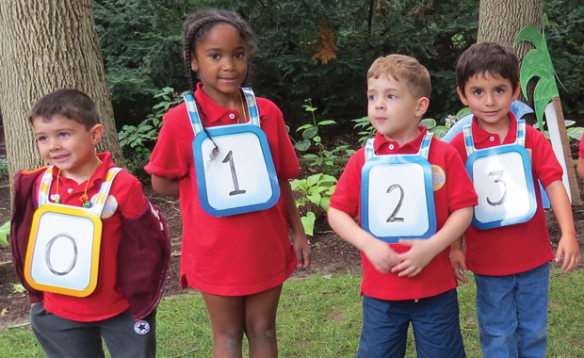
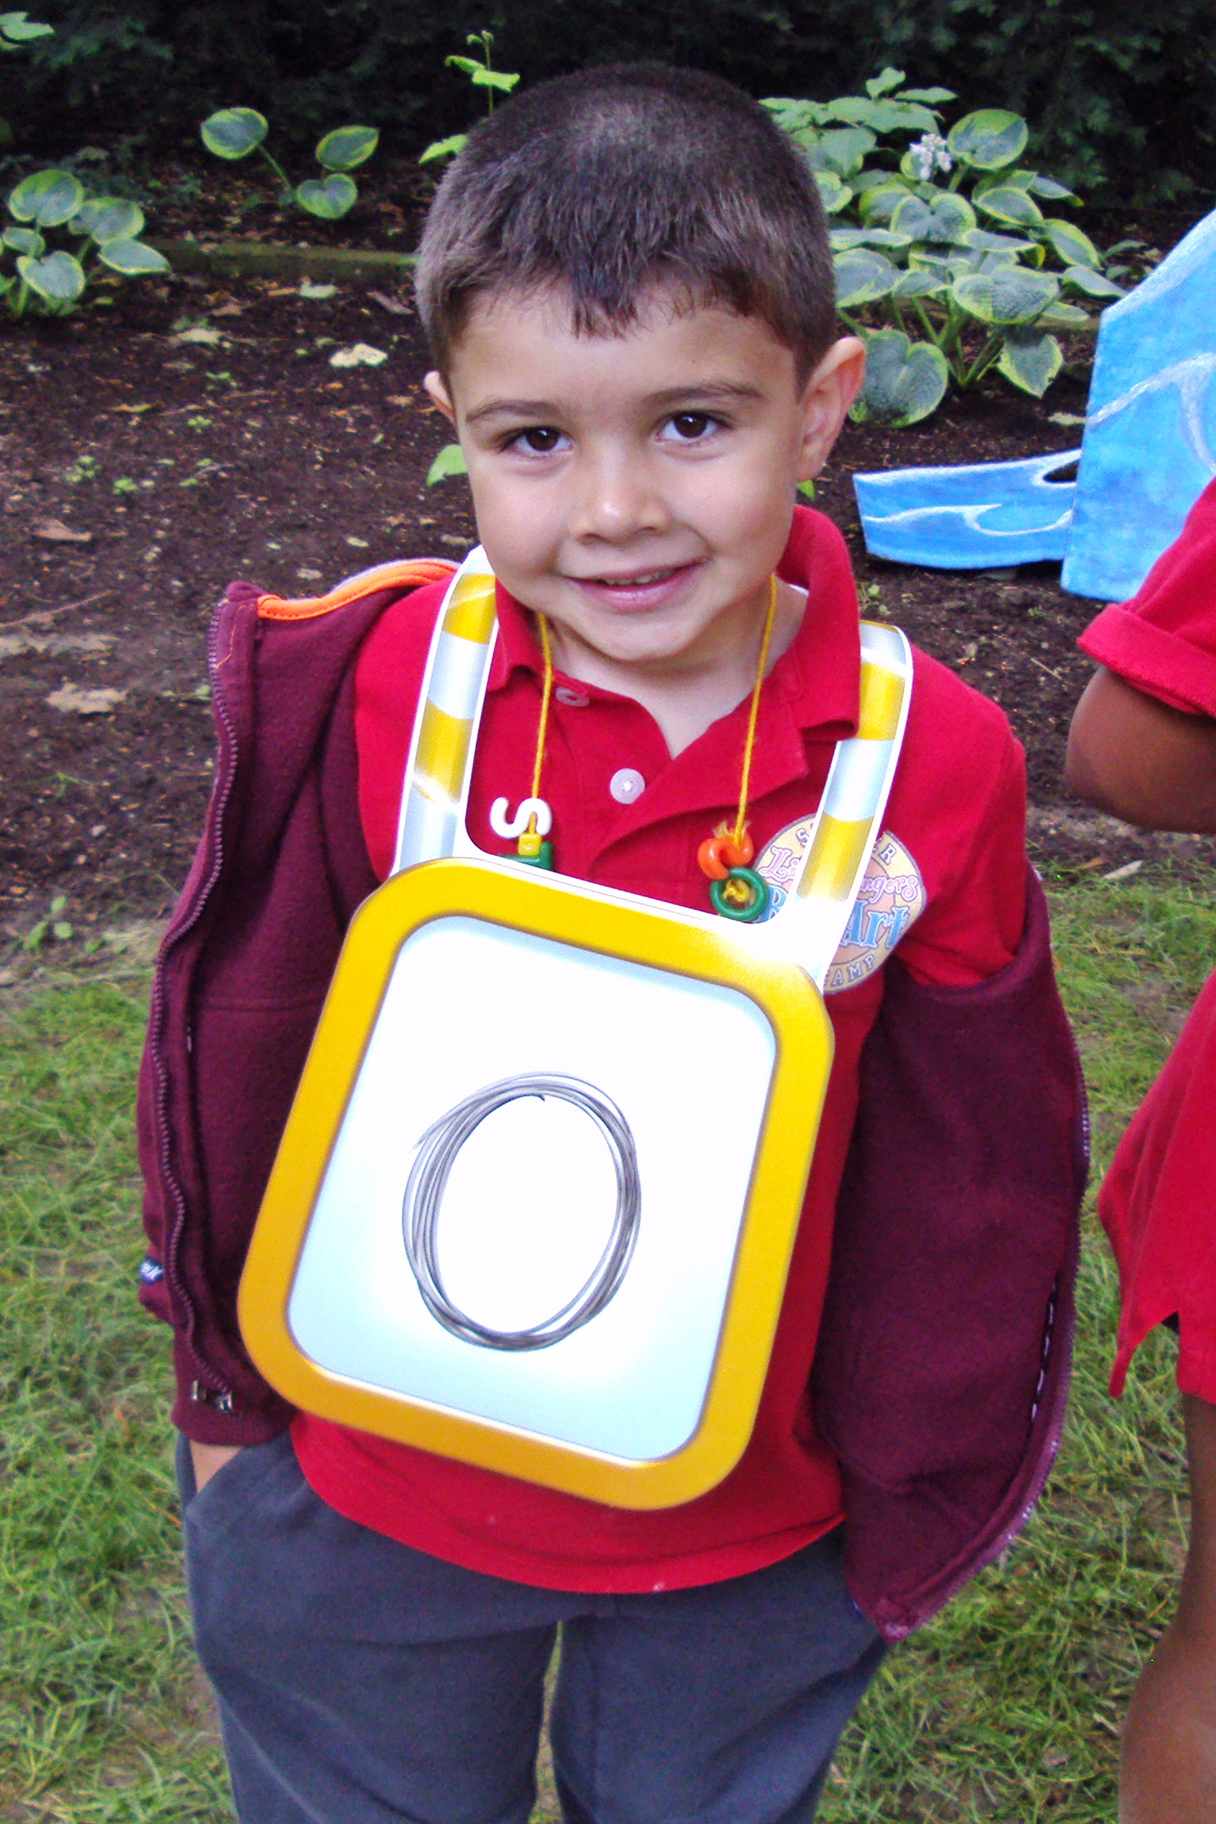
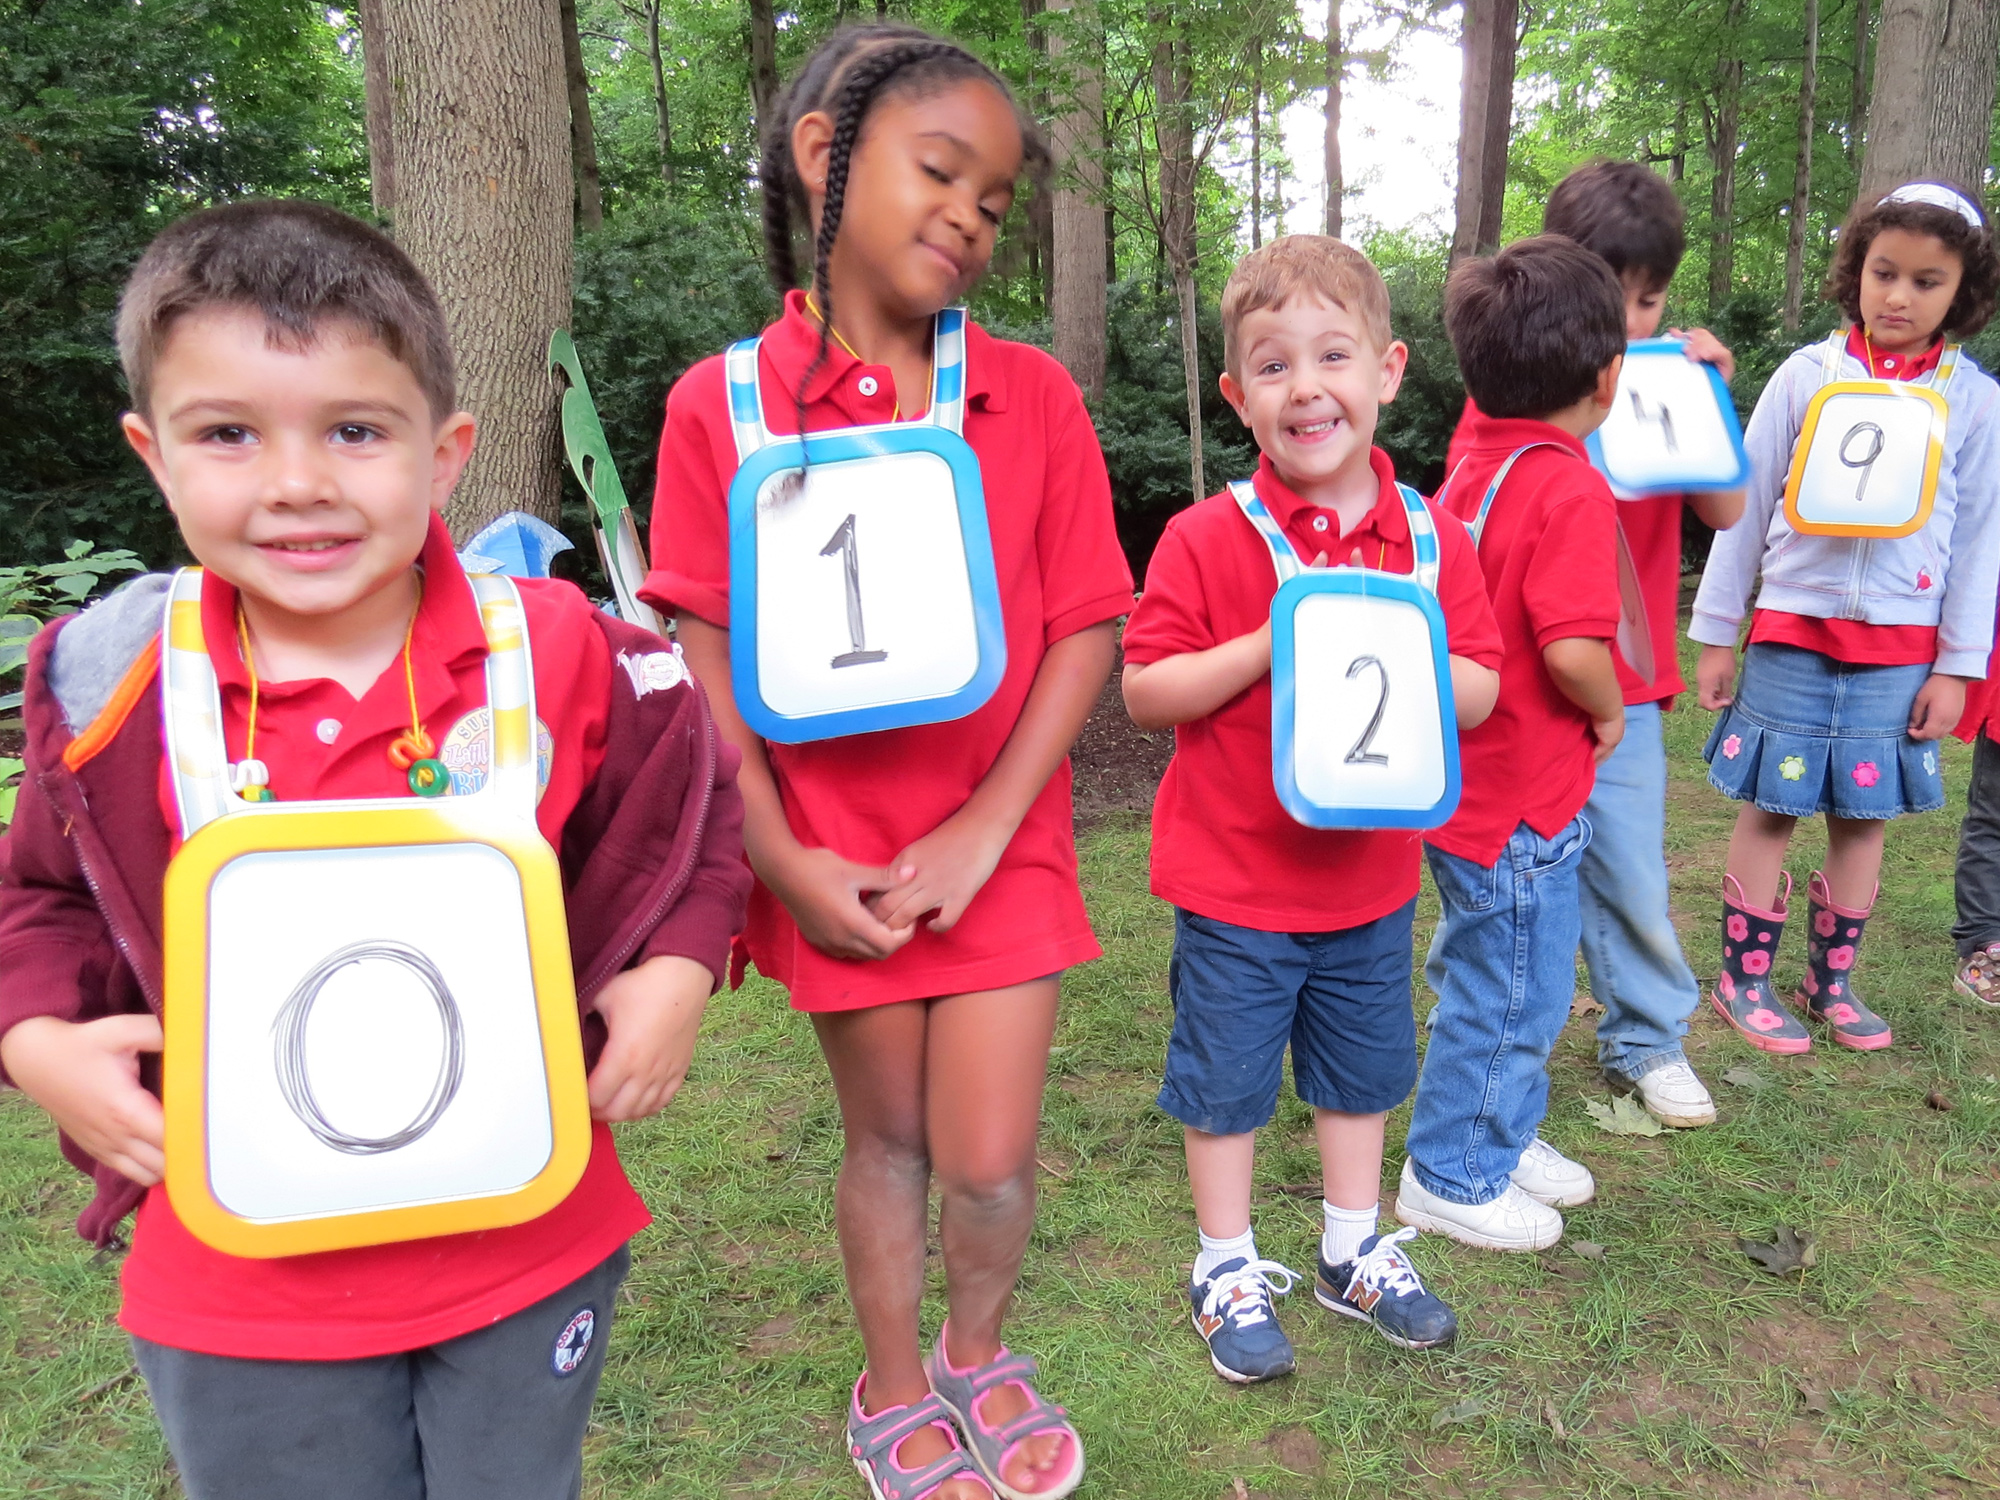
Keep track of your numbers and letters with Classroom Tunics! Every student can take part in the learning fun when they’ve donned their dry-erase pullover.
The R49620 Dry Erase Classroom Tunics fit nicely onto students’ shoulders. The tunic is designed to hold in place by the dry erase panels on the front and back. You can use the panels to write numbers, letters or other form of signage!
The best part is that the dry-erase tunics can be re-used over and over again.
It’s safe for children to wear and a great way to include students in group activities.
Ourfull guide gives you detailed resources for implementing the classroom tunics into 7 important subject ares of the curriculum. Learn how to integrate numbers into everyday learning while engaging students in fun activities such as color matching, sorting and more!
We wrote a number onto each of the students’ vests and asked them to organize themselves in the correct order. We intentionally left out some numbers to give the campers an extra challenge!
The students all had to work together to determine who went where in the number line. It was a great exercise.
The best challenge occurred when we changed some of our campers’ vests to subtraction, addition and equal signs. We then chose two students to stand on either side of the operation and work with their peers to figure out what the answer was!
There are so many great ways to use the Classroom Tunics. Even simply color-coding your students into groups makes the tunics well worth their while in your classroom!
Like us on Facebook, Share this post with your friends, or Subscribe to this blog today to receive original craft project updates every Monday, Wednesday and Thursday!