Our take on tear art uses simple materials: construction paper, crayons, rubbing plates and a bit of fine motor action! Find out how to create a gorgeous still life of a vase of summery flowers, or inspire some beachy fun with a colorful tropical fish portrait!
Age: 4+
Duration: 15-20 minutes
You’ll Need:
• R5871 Organic Rubbing Plates
• Construction paper in assorted colors
• Crayons
• Glue

For this activity, I chose to use our R5871 Organic Rubbing Plates, but you could use any of our rubbing plates that create a uniform pattern throughout the rubbing area. Try some of these rubbing plates made especially from Roylco:
R5817 Animal Skins Rubbing Plates
R5841 Optical Illusion Rubbing Plates
R5870 Linear Rubbing Plates

You will need to grab a reference photo to work from, such as the vase photo above. Look online for some ideas or browse through photography books for inspiration. Still life images are a great place to start for reference ideas. The subject is very clear to the viewer and usually shows something familiar, such as a vase with flowers or a basket of fruits. Once children have completed a still life image, they can try creating an action shot of an animal or a person with their tear art!

Place one rubbing plate beneath one of each construction paper color. Rub with a similarly colored crayon (or choose contrasting colors in neon for interesting effects).

You will only need to use half of the sheet. Cover the entire sheet of paper with the pattern if you plan to separate the pages to share between students.

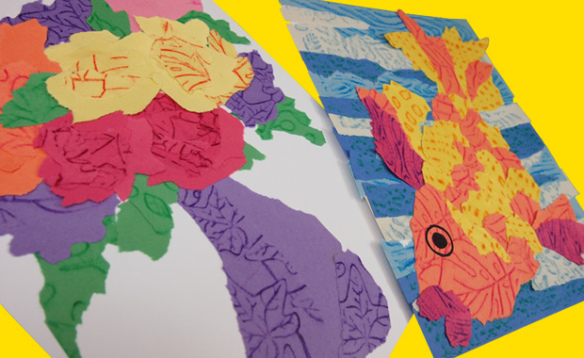
Exercise fine motor skills with crayon rubbings and tearing paper! Before you tear the construction paper, consider which colors will fill in certain parts of the illustration. For instance, the purple construction paper rubbing will serve as the vase in this image. Tear the construction paper into strips. Try not to use scissors, as that takes away from the “tear” in tear art! Keep the image in mind as you tear the paper. Since the vase is long, I tore the strips into longer sections. I tried to steer the the tear into a bowl shape near the bottom to mimic the roundness of the vase. Try it out!
Tip: Notice the glare on the sides of the vase. To achieve this effect, I used construction paper that wasn’t rubbed over. This took away from the texture while completing the look of the vase.

Tear the rest of the pieces in larger chunks to make the flowers. Arrange the torn pieces together so that they overlap into circle-like shapes. This will appear like flowers. Tear longer pieces for the leaves, and paste them down first. Layer the flowers on top.

I tore long strips of blue in varying shades to make the ocean background for the tropical fish portrait. I interspersed yellow and orange paper strips together to form the fish body. Tear two large pieces of red construction paper for the fins. Tear two smaller pieces of red construction paper and angle together to make the fish lips.

Beautiful work! There’s loads of fun you can have with tear art! I would love to see what kinds of art you create with this technique. Just send me an email with your artwork attached and I’ll write up a post about it!
CRAFT CHALLENGE:
Make a tear-art self portrait! Grab a mirror or a photo of yourself and try to recreate your likeness with torn strips of patterned paper. How artistic can you make your portrait? Send us photos of your work!!
Send all photos, comments or suggestions to subscriber@roylco.ca! Thanks for dropping by!

![]()