R2114 Colored Rice doesn’t work just as a collage material. It produces artwork that can be used in sensory activities! Non-toxic and easy to use. Check out more below!
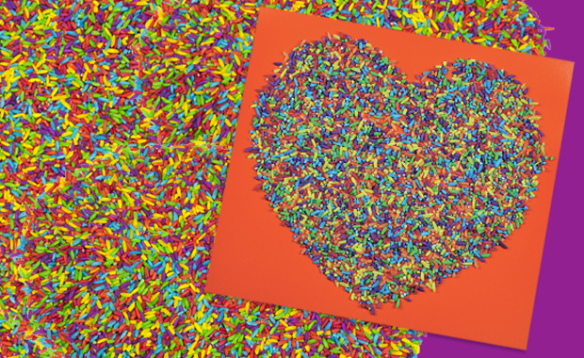
A basic way to use Colored Rice is to first draw a basic image onto construction paper. Construction paper holds up best against glue, which is what we will use to stick the rice on. When you’ve drawn out your simple shape onto the paper, prepare your glue.
First, make sure your workstation is completely covered in a plastic sheet or newspaper. This will be important for later on. We suggest using something to catch the excess rice in, such as our plastic paint trays! Drop the glue into a plastic bowl and use an old brush to spread it across all the interior parts of the shape.

Once you have completely spread a layer of glue onto the shape you’ve drawn, sprinkle a large amount of Colored Rice all over the construction paper sheet. Let the rice sit onto the sheet until the glue is completely dry.
When the glue is dry, gently lift up one edge of the paper and allow the excess rice to shake off. The rest will stick to the parts of the image that were covered in glue.
To see more about this process, watch the video below!
Your students’ projects can be used as sensory images! Ask students to choose one simple shape each to make (such as stars, flowers, squares, circles, etc). Cut out small squares (about 4 x 4″) from construction paper and distribute one square to each student. Students can draw their chosen shape onto their square, cover the shape with glue and apply the rice to make the sensory images. Shake off the excess when the glue is dry.
Gather children into groups. One student in each group will be the leader. The leader will collect everyone’s sensory images and tell everyone to close their eyes. While no one is looking, the leader randomly distributes one sensory image to each student. Students must keep their eyes closed and feel over the rice texture to guess what shape it is!

Thanks for dropping by! Explore our site to see more crafts like this. If you were inspired to make something from this craft, send us photos of your work to subscriber@roylco.ca and we will publish a special post! We’d love to hear from you!

![]()