Christmas Tree Heart Mosaics

2014-11-26-FeatureImage

Christmas is a month away, but what better way to get into the holiday spirit than to build your own tree on paper using our R15367 Heart Mosaics!

Age: 4+

Duration: 10 minutes

Learning Objectives: Layer multiple pieces together. Identify biggest to smallest and coordinate similar colors. Make associations between the shapes in order to create a larger picture. Develop fine motor skills through sorting, placing and gluing the pieces. Discuss triangles as a geometric shape and use

You’ll Need:

R15367 Heart Mosaics

R22052 Double Color Card Sheets

• Glue

Line-06

This is an easy project to do, but makes a great activity for students as they are waiting to transition between class periods or as a thematic holiday art project.

P1015794

This activity requires very little preparation; all you need are materials that you may already have in your classroom! Give each group of students a pile of Heart Mosaics to sort through. Although we’ve chosen a purple background for our Christmas tree, you can use any color from the Double Color Card Sheets set as a backing to your designs.

P1015796

This step allows you to talk a little bit about the basic structure of a Christmas tree. It isn’t just lights and decorations. The shape of the tree is important. Traditionally, most Christmas trees should have the basic shape of a triangle, which is what we are going to make first with our Heart Mosaics.

Ask your students to separate their Heart Mosaics into like colors of green. We have several different colors of green to choose from, so all students will get a chance to make trees.

P1015800

Start with the largest Heart Mosaic pieces first. Locate the largest pieces and place them upside down at the bottom of the card sheet. Make a wide base.

P1015801

Add a few more upside-down pieces to the base, moving upward. Angle the ends of the Heart Mosaics inwards so that the shape of the overall tree takes on a triangular form.

P1015805

Keep adding and angling the smaller Heart Mosaics inwards as you progress to the top. Choose two small and skinny Heart Mosaics to form the peak of the tree.

P1015807

Now it’s time to decorate. Select several smaller Heart Mosaics to form the ornaments as pops of color. Turn the Heart Mosaics right side up and place them on top of the green tree.

P1015812

Decorate the tree just as you would at home! Space out the ornaments in an even, balanced way.

P1015813

Finally, top your Christmas tree with a bright yellow Heart Mosaic. Glue down all the pieces. Students can take their Christmas trees home or tack them up on a board as part of a Christmas display!

Check out another great project with Heart Mosaics:

Make a beautiful tree of hearts for Valentine’s Day cards, for a birthday or just to show someone how much you love them!

Line-06

Like us on FacebookShare this post with your friends, or Subscribe to this blog today to receive original craft project updates every Monday, Wednesday and Friday!

Craft Spotlight: My Garden Stained Glass Frames

2014-03-31-FeatureImageBeautiful stained glass frames can be made by cutting out bits of 15257 Stained Glass Paper to fill in the gaps of the frame design. We got some great shots of the Art Campers hanging up the 52089 My Garden Stained Glass Frames in the garden!

_DSC0312

The My Garden Stained Glass Frames come in 8 designs. Your students can choose between a bee, spiderweb, dragonfly, butterfly and various flower designs! These Stained Glass Frames feature pre-punched holes, so you can hang your students’ finished frames from the ceiling in your classroom.

_DSC0309

First, trace the gaps of the stained glass frames onto a sheet of Stained Glass Paper. Cut a bit of a border around the outline. Spread some glue around the border and press onto the back of the stained glass frame.

_DSC0310


Be sure to change up the colors of the stained glass paper that you use. That way, the design will really stand out!

Line-16

Thanks for viewing this post! Subscribe today for updates every Monday, Wednesday and Friday on new product information, craft projects and guest post! Send us your comments or questions to subscriber@roylco.ca.

Craft Spotlight: Paint Bellows

_DSC0071

Explore a new painting technique with Paint Bellows! These neat little painting tools feature an accordion-style chamber to help push paint out in a splatter-like design. 

A few drops of tempera paint go a long way with this painting tool! First, press out all the air from the Paint Bellows chamber. To do this, squeeze the spout in between your pointer and third finger, and place your thumb on the flat back of the bellow chamber. Press your thumb down onto the chamber. Press towards the spout. This will make all the air in the Paint Bellow escape from the chamber.

Hold the Paint Bellow in this position and lower the spout into a small amount of paint. Release your thumb from the back of the chamber while holding the Paint Bellow in place. You want to make sure you have just a little amount of paint. A little is a lot with Paint Bellows!

NOTE: Use only thicker tempera paint with the Paint Bellows. Watercolor paints or watered-down paints tend to “leak” across the page rather than create the dotted splatter effect.

R5419

The splatter effect is created when an empty Paint Bellow chamber is suppressed then quickly released onto a sheet of paper. The video below shows some artwork that can be made with Paint Bellows. It’s all in the technique!

Line-13

Thanks for viewing this post! Subscribe to us for updates every Monday, Wednesday and Friday or drop a line at subscriber@roylco.ca! We’d love to hear from you.

Butterfly Day at the Art Junction!

The amazing art community at the Art Junction made butterfly crafts using our R2450 Bug Bodies during one of their family days! See more of their brilliant artwork at the Art Junction blog

The Bug Bodies were combined with painted coffee filters to make the bug wings. Antennae were formed from pipe cleaners that were threaded through the top of the Bug Body heads.

The post was made on April 3, 2012 and is entitled: “Butterfly Day.” See the full post at the link provided!

The little artists used full sized coffee filters to explore the different effects of patterning colors and diffusion. The painted coffee filters were going to be used for the butterfly wings. While the artists were waiting for the coffee filters to dry, they explored another technique to create “butterfly” artwork: blotto painting! View the post to see more about their blotto painting strategies.

The coffee filters were cut in half and slipped through the slim opening in the side of the Bug Body. Once the Bug Body could be placed in the center of the folded coffee filter, the ends of the coffee filter were fanned out to produce a butterfly-wing effect.

Images and original post © Artmanews

This post was not sponsored for a review. At LittleFingersBigArt, our mission is to present to our readers and viewers the newest and most creative craft ideas that fans of Roylco have made on their own. Our goal is to allow you and other educators and parents to reuse our products in fun ways so that children always get the best educational experience from them!

We’d love to see more ideas like this one! If you’ve got a brilliant craft idea or have made a version of one of our crafts that you would like to share with us, send an email to subscriber@roylco.ca with photos, descriptions or a link to your work. We will create a feature post and link back to you with full credit. We’d love to hear from you!

Line-22

Thanks for stopping by to view this post!

Snowflake Wax Resist Art

Roylco Snowflake Wax Resist Art

Feature-Image-rubplatesnowflakesLearn the technique for making beautiful wax resist art–give your students something to work on as they return to their school routine after the holidays, and help them create an art piece that they can be proud of!

Age: 3+

Duration: 15 minutes

You’ll Need:

R58622 Super Snowflake Stencils

• Paper towel

• White crayon

• Blue watercolor paint

• White paper (8.5 x 11″)

• Paint tray

Line-20

We’ve done it! Days of experimentation, combining a multitude of products and materials, testing this paint versus that crayon…. and here we are! Use our Snowflake Rubbing Plates to make simple but beautiful wax resist art. Decorate your classroom during the winter months with your students’ projects!

2013-12-12-snowflakerubplates01
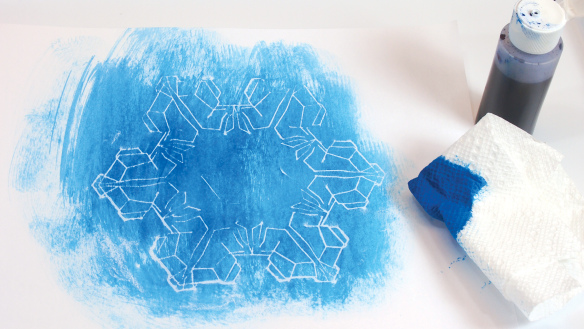
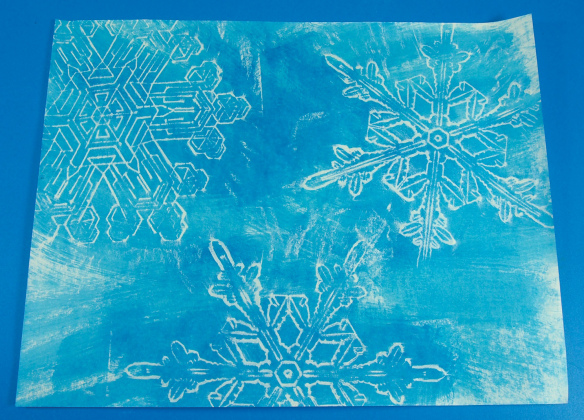
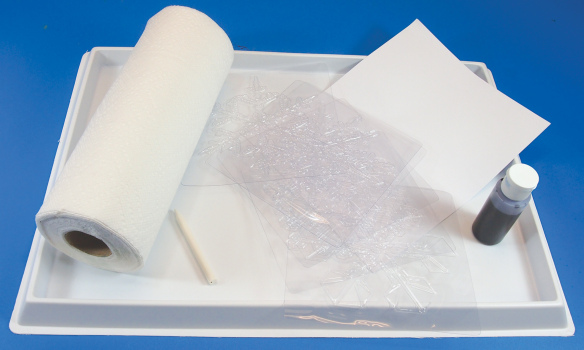
The paint tray is essential for keeping work-spaces clean while spreading paint onto the paper.

2013-12-12-snowflakerubplates02
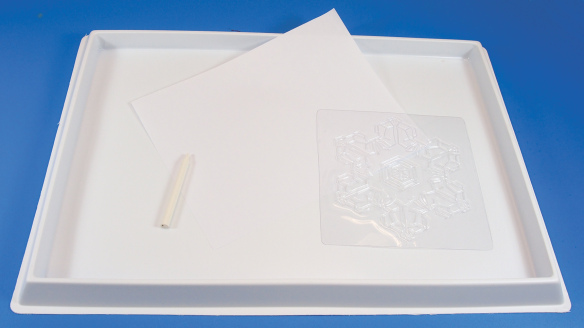
Place one of the Snowflake Rubbing Plates underneath the white paper. Tip: Tape the edges of the Snowflake Rubbing Plate to the paint tray to keep it from moving about. This will be important for the next step.

2013-12-12-snowflakerubplates03
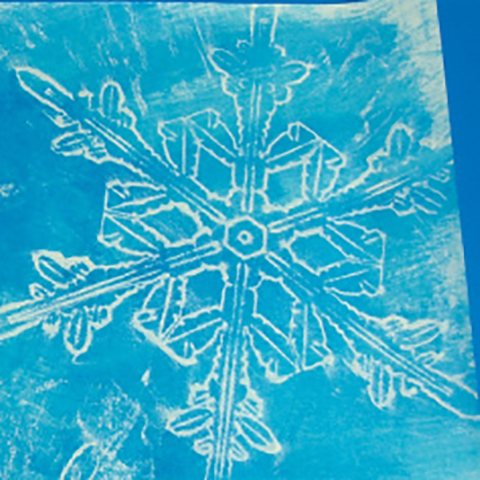
Rub the white crayon across the surface of the paper. Make sure the rubbing plate stays in one spot while you rub the page with the crayon.2013-12-12-snowflakerubplates06

Tear one sheet of paper towel and fold it into a square. Dip a corner of the square into the blue watercolor paint. Next, dab the dipped corner onto the white crayon rubbing. Spread the paint outwards from the center. You will start to notice the crayon rubbing “pop” out from the paint color.

2013-12-12-snowflakerubplates08

Make additional crayon rubbings at various angles on the white paper. Use different Snowflake Rubbing Plates or vary the position of the snowflakes.

Line-20

Thanks for stopping by! If you liked this craft and would like to share your version with us, send us an email to subscriber@roylco.ca with photos! We’d love to hear from you!